
How to Tune an Autoharp: Quick and Easy Guide for Beginners
Folkstrings.com is reader-supported. When you buy through links on our site, we may earn a small commission.
Tuning an autoharp might seem like a daunting task, but with some guidance and practice, you’ll be able to achieve the perfect sound for your instrument. Whether you’re a beginner or a seasoned player, regular tuning is essential for maintaining your autoharp’s sound quality and performance.
First, make sure you have a reliable tuner, such as an electronic tuner or tuning app, to help you accurately identify each note. Tuning an autoharp involves adjusting the tension of its strings to match their corresponding pitches. Patience and attentiveness are key aspects, as you’ll be dealing with numerous strings.
Once you have your tuner ready, it’s important to identify the starting note and determine the correct octaves for each string. This process can be time-consuming, but it’s crucial for achieving the desired sound. Remember to tune often and gradually become more confident in your autoharp tuning abilities. Soon, you’ll be able to create beautifully tuned music with your instrument.
Table of Contents
Autoharp Basics
Before diving into tuning your autoharp, it’s essential to understand some of the instrument’s fundamental features. Autoharps typically have 36 to 37 strings which are arranged in chromatic order, meaning each string represents a separate note. The strings are further divided into three sets of 12, covering three different octaves.
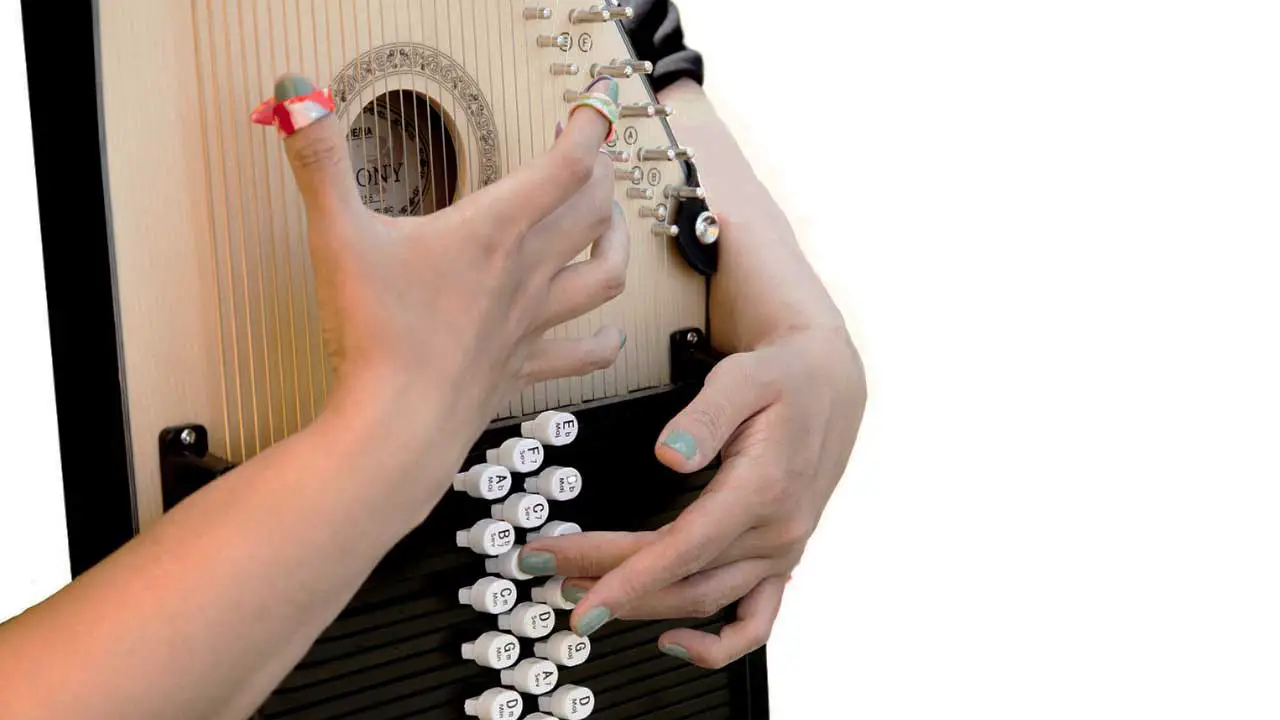
On your autoharp, you will find a series of chord bars and buttons. These buttons, when pressed down, activate the chord bars which mute the strings that do not belong to the specific chord, leaving the appropriate strings to create the desired harmony. Autoharps commonly have 15 or 21-chord bars, offering a wide range of chord options for accompanying various styles of music.
It’s essential to take good care of your autoharp to maintain optimal sound quality and ensure its longevity. Regularly clean the instrument and check for any damage, such as worn-out felt on chord bars or loose screws that may need tightening. Furthermore, it’s a good idea to store your autoharp in a case or gig bag to protect it from dust and potential damage when not in use.
Below is a list of the primary components of an autoharp:
- Strings: usually 36 to 37 strings, arranged in chromatic order
- Chord bars and buttons: control the activation of chord bars to form specific chords
- Felt pads: located under chord bars, used to mute strings not part of the selected chord
- Tuning pegs: used for adjusting the tension and pitch of each individual string
Now that you have a basic understanding of the autoharp’s components and functions, you’re ready to learn how to fine-tune your instrument and achieve the perfect sound for your musical expression.
Tools Required
Before you start tuning your autoharp, make sure you have the right tools in hand. Having the correct tools will make the tuning process smoother and more efficient. Here are some essential tools you will need:
- Tuning wrench: This is a critical tool for tightening and loosening the tuning pegs. Make sure to have a suitable wrench that fits the pegs of your autoharp. If you don’t have one, you can learn to tune your autoharp without a tuning wrench below.
- Electronic tuner or tuning app: Using an electronic tuner or a smartphone app will help you achieve accurate pitch adjustments for each string. Most electronic tuners and apps can detect the pitch of the strings and provide guidance on tightening or loosening the string accordingly.
- Needle-nose pliers: These can be helpful in detaching and reattaching strings if needed. Be careful while using pliers to avoid damage to the strings or the instrument itself.
- Wire cutters: If you need to replace any strings, wire cutters will be essential for cutting new strings to their correct length.
Once you have gathered all the necessary tools, you will be ready to begin the tuning process.
Tuning Step-By-Step
Identify the String Notes
Before you start tuning your autoharp, it’s essential to become familiar with the string notes. You can find this information in your autoharp manual, or you can check for the string layout online. Knowing the string notes will help you tune the instrument more efficiently and accurately.
Using a Tuner
To tune your autoharp, you’ll need a digital tuner. Clip-on tuners work best because they can be attached to the tuning pegs or near the string you want to tune.
Turn on the tuner and ensure it’s set to the right mode for your autoharp. You can refer to your tuner’s instructions for detailed settings.
When you’re ready to start tuning, pluck a string on your autoharp and observe the tuner’s reading. The tuner will indicate whether the note is sharp (right of 0) or flat (left of 0). Adjust the tuning peg accordingly to reach the desired note.
Setting the Pitch
Once your tuner is set up, start tuning each string by adjusting its tuning peg. If the string is flat, tighten the peg to raise the pitch; if the string is sharp, loosen the peg to lower the pitch. Work your way through all the strings methodically, starting with the lowest note and proceeding to the highest.
Methodical Tuning
When tuning your autoharp, it’s best to follow a methodical approach. Start by tuning the strings in groups, focusing on the lower octave strings first, then moving to the middle octave and finally the higher notes. Prioritize the outer strings as they tend to be more challenging to tune.
After you’ve tuned all the strings, give your autoharp a thorough play-through to check for any discrepancies. You may need to fine-tune certain strings to ensure the instrument sounds harmonious. Repeat this process until you’re confident that your autoharp is properly tuned.

How to Tune an Autoharp Without a Tuning Wrench
If you don’t have a tuning wrench, there are alternative methods to tune your autoharp. This section will cover a few techniques to make sure your instrument sounds great.
One way to tune an autoharp without a tuning wrench is by ear, using the notes on the strings. Autoharps have a unique layout of strings and levers, with each string labelled by the note it plays when not dampened by levers. Carefully listen to the string you are tuning and compare it to a reference note played on an accurate instrument, like a piano or a tuning fork.
If tuning by ear is not your preferred method, consider using an online tuner. Websites like tuning-fork.com or autoharp.net can help you tune your autoharp(source). By following the instructions on the website, you can input the notes you hear and receive feedback on how close your string is to being in tune and how much adjustment you need.
Although these methods allow you to tune your autoharp without a tuning wrench, investing in a proper tuning wrench can make the process easier and more accurate. Using a tuning wrench ensures a comfortable grip while adjusting the tuning pegs and prevents accidental damage to your instrument.
Fine-Tuning Tips
Once you’ve roughly tuned your autoharp using standard tuning techniques, it’s time to fine-tune your instrument for optimal performance. Here are some tips to help you with the fine-tuning process:
Firstly, double-check the tuning of each string using an electronic tuner, ensuring that the strings are as close as possible to the perfect pitch. If a string is flat (needle to the left of 0), you’ll need to raise its pitch, while if it’s sharp (needle to the right of 0), you’ll need to lower it.
For select autoharps that feature fine-tuning pins, use a fine-tuning wrench to tighten or loosen the screws at the base of each string. Employ clockwise and counterclockwise motions as necessary to make small adjustments in pitch[source].
When tuning an autoharp with several string pairs that need to be tuned in unison and beatless, Daigle Flatline fine tuners can be quite useful. These can be fine-tuned by turning the Allen screw of each string with a small wrench.
Keep in mind the relationship between the different octaves of your autoharp. After tuning the fundamental octave, play a note on the instrument and adjust the other octaves until all strings are in tune, ensuring they are an octave apart.
Lastly, be patient and take your time while fine-tuning your autoharp, as it might require multiple adjustments to achieve the desired sound.
Common Issues and Solutions
When tuning your autoharp, you may encounter some common issues. Here, we provide a few solutions to help make the process smoother.
1. Slipping Tuning Pins: A common issue is tuning pins that slip out of place, causing the instrument to go out of tune. One solution for slipping tuning pins is to gently tap them back in place and re-tune the string. Alternatively, consider purchasing oversized tuning pins, which can better fit into the hole and maintain their position (source).
2. Difficulty in Hearing the Pitch: Tuning an autoharp can be challenging, especially if you have difficulty hearing the pitch. An electronic tuner can make the process much easier by providing a clear visual indication of the pitch (source). These tuners often come with a built-in microphone or can be connected directly to your instrument.
3. Uneven Octaves: If your autoharp’s octaves don’t sound even, it’s crucial to make sure that the fundamental octave and all other octaves are in tune (source). An efficient way to achieve this is by playing a note and tuning other octaves until they match with the fundamental octave.
Remember, patience and practice are essential for mastering autoharp tuning. With the proper maintenance and care, your autoharp will provide you with years of beautiful music.
Author Profile
-
Daniel Johnstone is an English writer with a love for stringed instruments from around the world.
He shares his love for these instruments through his writing for folkstrings.com, a website dedicated to all things related to folk string music.
Daniel's passion for music started at a young age, and he has since become an accomplished musician, playing guitar, cavaco, and recently, the harp.
His dedication to learning and sharing his knowledge of stringed instruments is evident in his insightful and engaging blog posts. Whether you're a seasoned musician or a beginner, Daniel's writing is sure to inspire and entertain you.
When he's not playing music or writing, you can find Daniel exploring new instruments and seeking out new sounds to share with his readers.
Latest entries
 AutoharpApril 4, 2024What Is the Autoharp Made Of: Exploring Its Materials and Craftsmanship
 AutoharpApril 4, 2024Is Autoharp Easy to Play? Unveiling the Truth for Beginners
- AutoharpApril 4, 2024What Is an Autoharp Worth? Your Guide to Pricing and Value
 AutoharpApril 4, 2024Are Autoharp and Zither the Same Thing? Unraveling String Instrument Myths
Affiliates:
This post may contain affiliate links that at no additional cost to you, the site may earn a small commission. We only recommend products we would use ourselves and all opinions expressed on this site are our own.
Accuracy Advice:
While we strive to provide up-to-date and accurate information, the content in this article may not reflect the most current research or medical guidelines. We encourage readers to do further research and consult with professionals for more personalized advice.
Our Recommendations:
The products and services mentioned in any of our articles are recommended based on our independent research and personal experience. We are not sponsored by any company. We aim to suggest products and services we believe are of high quality and could be beneficial to our readers.


I have several chromatic tuners, my problem is that my tuner says the string is a B but the harp is labeled F, I find this on a lot of String, they do not agree with the labele on the harp. WHY is this and what can I do about it